Meet Reuben Margolin, a visionary Maker who creates elegant and hypnotic techno-kinetic wave sculptures.
Kinetic Wave Sculptures from make magazine on Vimeo.


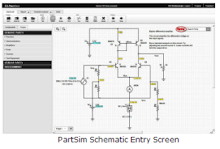
MPXV7002 as Breath Sensor
3 days ago


Meet Reuben Margolin, a visionary Maker who creates elegant and hypnotic techno-kinetic wave sculptures.
Kinetic Wave Sculptures from make magazine on Vimeo.
I don't usually post this sort of stuff. But I have an 8 month old Son. I couldn't resist!
Apparently he was 7 years old when he did this. Amazing!
Also Check out his Site
 This is a lot of fun if you have maya 2009's IPR and an 8 proc machine. I will try some more ambitious environment stuff soon.
A stopwatch that is timecode based. This will be the foundation for all of my motion control R and D. Eventually I hope to drive all of the mechanics by a sync pulse from a video camera. Until then this setup will have to suffice.
Here's a copy of the code used in this project.
/* Frame Rate Stopwatch By Daniel Thompson http://danthompsonsblog.blogspot.com
 *
 * This sketch is based on Paul Badger's StopWatch sketch which can be found here:
 * http://arduino.cc/en/Tutorial/Stopwatch
 *
 * The Frame Rate Stopwatch sketch runs at 25fps (PAL Video) by default and has an adjustable frame rate.
 * Just change the framerate variable to suit your needs.
 * Demonstrates using millis(), pullup resistors,
 * making two things happen at once, printing fractions
 *
 * Physical setup: momentary switch connected to pin 2, other side connected to ground
 * LED with series resistor between pin 13 and ground
 * LCD Display setup as described in this tutorial:
 * http://www.ladyada.net/learn/arduino/lcd.html
 * Easydriver v3.1 board. by Brian Schmalz http://schmalzhaus.com/EasyDriver/
 * Sparkfun Stepper Motor Connected to the Easydriver as described in this tutorial:
 * http://danthompsonsblog.blogspot.com/2008/09/easydriver-v31-tutorial.html
 * 12v 0.4a regulated DC power supply.
 *
 * ///////////////////////////////////////////////////////////////////////////////////////
 * Hardware hookup guide for Jaycar's 2x16 character backlit LCD Display MODEL No.QP5518
 * ///////////////////////////////////////////////////////////////////////////////////////
 *
 * Note: Includes hookup info for use with a 10k Pot for contrast control.
 *
 * connect LCD PIN DB11 ------> Output PIN 7
 * connect LCD PIN DB12 ------> Output PIN 8
 * connect LCD PIN DB13 ------> Output PIN 9
 * connect LCD PIN DB14 ------> Output PIN 10
 * connect LCD PIN R/W -------> Ground
 * connect LCD PIN 5v ------------> 10k Pot (left pin)and 5v supply
 * connect LCD PIN Contrast ------> 10k Pot (middle pin)
 * connect Ground -------> 10k POT (right pin)
 * connect LCD PIN Gnd 0v ------> Ground
 * connect LCD PIN REGISTOR SELECT ------> Output PIN 11
 * connect LCD PIN ENABLE SIGNAL ------> Output PIN 12
 * connect LCD PIN Gnd 0v ------> Ground
 */


#include <LCD4Bit.h>
//create object to control an LCD.
//number of lines in display=1
LCD4Bit lcd = LCD4Bit(1);

#define ledPin  13                  // LED connected to digital pin 13
#define buttonPin 2                 // button on pin 2
#define steppin 5                   // Easydriver step pin on pin 5
#define dirpin 3                    // Easydriver step pin on pin 3

int value = LOW;                    // previous value of the LED
int buttonState;                    // variable to store button state
int lastButtonState;                // variable to store last button state
int blinking;                       // condition for blinking - timer is timing
int frameRate = 25;                 // the frame rate (frames per second) at which the stopwatch runs - Change to suit
long interval = (1000/frameRate);   // blink interval
long previousMillis = 0;            // variable to store last time LED was updated
long startTime ;                    // start time for stop watch
long elapsedTime ;                  // elapsed time for stop watch
int fractional;                     // variable used to store fractional part of Frames
int fractionalSecs;                 // variable used to store fractional part of Seconds
int fractionalMins;                 // variable used to store fractional part of Minutes
int elapsedFrames;                  // elapsed frames for stop watch
int elapsedSeconds;                  // elapsed seconds for stop watch
int elapsedMinutes;                 // elapsed Minutes for stop watch
char buf[10];                       // string buffer for itoa function

void setup()
{
 Serial.begin(9600);
 pinMode(ledPin, OUTPUT);         // sets the digital pin as output
   lcd.init();                      // intialise the LCD.
   pinMode(buttonPin, INPUT);       // not really necessary, pins default to INPUT anyway
   digitalWrite(buttonPin, HIGH);   // turn on pullup resistors. Wire button so that press shorts pin to ground.
   pinMode(dirpin, OUTPUT);
 pinMode(steppin, OUTPUT);
}

void loop(){

 ///////////////////////////////////////
   //   Initiate LED and Step Pin States
   ///////////////////////////////////////

 digitalWrite(steppin, LOW);                           // Initiate the Easy Driver step pin ready for a rising edge
   digitalWrite(ledPin, LOW);                            // set the Led to Low

 //////////////////////////////
   //   Check for button press
   //////////////////////////////
   buttonState = digitalRead(buttonPin);                // read the button state and store

 // check for a high to low transition if true then found a new button press while clock is not running - start the clock
   if (buttonState == LOW && lastButtonState == HIGH  &&  blinking == false){
    startTime = millis();                             // store the start time
      blinking = true;                                  // turn on blinking while timing
      delay(5);                                         // short delay to debounce switch
      lastButtonState = buttonState;                    // store buttonState in lastButtonState, to compare next time
   }

 // check for a high to low transition if true then found a new button press while clock is running - stop the clock and report
   else if (buttonState == LOW && lastButtonState == HIGH && blinking == true){
 blinking = false;                                    // turn off blinking, all done timing
   lastButtonState = buttonState;                       // store buttonState in lastButtonState, to compare next time

 /////////////////////////////////////////////
   //     Routine to report elapsed time
   /////////////////////////////////////////////
   elapsedTime =   millis() - startTime;                // store elapsed time
   elapsedMinutes = (elapsedTime / 60000L);
 elapsedSeconds = (elapsedTime / 1000L);              // divide by 1000 to convert to seconds - then cast to an int to print
   elapsedFrames = (elapsedTime / interval);            // divide by 40 to convert to 1/25 of a second - then cast to an int to print
   fractional = (int)(elapsedFrames % frameRate);       // use modulo operator to get fractional part of 25 Frames
   fractionalSecs = (int)(elapsedSeconds % 60L);        // use modulo operator to get fractional part of 60 Seconds
   fractionalMins = (int)(elapsedMinutes % 60L);        // use modulo operator to get fractional part of 60 Minutes
   lcd.clear();                                         // clear the LDC

 if (fractionalMins < 10){                            // pad in leading zeros
      lcd.printIn("0");                                 // add a zero
      }

    lcd.printIn(itoa(fractionalMins, buf, 10));       // convert the int to a string and print a fractional part of 60 Minutes to the LCD
      lcd.printIn(":");                                 //print a colan.

 if (fractionalSecs < 10){                            // pad in leading zeros
      lcd.printIn("0");                                 // add a zero
      }

 lcd.printIn(itoa(fractionalSecs, buf, 10));          // convert the int to a string and print a fractional part of 60 Seconds to the LCD
   lcd.printIn(":");                                    //print a colan.


 if (fractional < 10){                                // pad in leading zeros
      lcd.printIn("0");                                 // add a zero
      }

 lcd.printIn(itoa(fractional, buf, 10));              // convert the int to a string and print a fractional part of 25 Frames to the LCD
   }

 else{
      lastButtonState = buttonState;                  // store buttonState in lastButtonState, to compare next time
   }

 ////////////////////////////////////////////////////
   //    run commands at the specified time interval
   ////////////////////////////////////////////////////

 // blink routine - blink the LED while timing
 // check to see if it's time to blink the LED; that is, the difference
 // between the current time and last time we blinked the LED is larger than
 // the interval at which we want to blink the LED.

 if ( (millis() - previousMillis > interval) ) {

    if (blinking == true){
       previousMillis = millis();                    // remember the last time we blinked the LED

       digitalWrite(ledPin, HIGH);                   // Pulse the LED for Visual Feedback
         digitalWrite(steppin, HIGH);                  // create a rising edge for the Easydriver to step the motor once


       elapsedTime =   millis() - startTime;         // store elapsed time
         elapsedMinutes = (elapsedTime / 60000L);      // divide by 60000 to convert to minutes - then cast to an int to print
         elapsedSeconds = (elapsedTime / 1000L);       // divide by 1000 to convert to seconds - then cast to an int to print
         elapsedFrames = (elapsedTime / interval);     // divide by 40 to convert to 1/25 of a second - then cast to an int to print
         fractional = (int)(elapsedFrames % frameRate);// use modulo operator to get fractional part of 25 Frames
         fractionalSecs = (int)(elapsedSeconds % 60L); // use modulo operator to get fractional part of 60 Seconds
         fractionalMins = (int)(elapsedMinutes % 60L); // use modulo operator to get fractional part of 60 Minutes
         lcd.clear();                                  // clear the LDC

       if (fractionalMins < 10){                     // pad in leading zeros
         lcd.printIn("0");                             // add a zero
         }

       lcd.printIn(itoa(fractionalMins, buf, 10));   // convert the int to a string and print a fractional part of 60 Minutes to the LCD
         lcd.printIn(":");                             //print a colan.

       if (fractionalSecs < 10){                     // pad in leading zeros
         lcd.printIn("0");                             // add a zero
         }

       lcd.printIn(itoa(fractionalSecs, buf, 10));   // convert the int to a string and print a fractional part of 60 Seconds to the LCD
         lcd.printIn(":");                             //print a colan.

       if (fractional < 10){                         // pad in leading zeros
         lcd.printIn("0");                             // add a zero
         }
          lcd.printIn(itoa((fractional), buf, 10));  // convert the int to a string and print a fractional part of 25 Frames to the LCD
         }

    else{
          digitalWrite(ledPin, LOW);                 // turn off LED when not blinking
          }
 }

}
Well I had to wait 3 weeks for it, but it finally arrived in the post this week! It's a Pan and Tilt Camera Head from Servo City. This web site is sells just about everything you need if you are into designing and building your own robot contraptions. This head will be the basis for all of my bench testing as I try to construct my own DIY Motion Control Camera Rig.
The head is designed for use with an RC servo. But I'm planning to use stepper motors with it. So there will need to be a few major modifications to the head before I can show it in action. I'm starting a relationship with a local fabrication shop here in Adelaide to help me with some of the tricky parts.
The first step is to model it all in 3D so I can make changes to the design and send the files to the engineer for a quote (well, that's the idea anyway)
The two main changes I will need to make are:
1.) Retro fit the stepper motors. Each with it's own worm gear box.
2.) Make it possible for nodal point offsets. This is essential if I want to make a good panoramic stitch from multiple images. It's also important for extracting 3D move data if I'm shooting a Visual Effects shot.
Here's some pictures!


Here's two Characters I Designed, Modelled, Textured and Rigged for a short film I am working on called First Light.
Below are the Maquettes that we used as reference while shooting the miniature sets which would later serve as background plates for the final compostie. I sculpted these myself at 1:10 scale out of super sculpey.
The Bottom character, RB7 was made from a robot toy that I re-proportioned to match the CG character. The head, calves and chest piece were the only parts made from super sculpey. A friend from film school helped me out with his head due to time constraints. 

This was a Promo Clip for Thinktank's European Tour in 2003. The clip was shot at two different venues in Adelaide. I edited the video and shot about half of it. Good times.. :)
Andrew Schneider is a performance artist, body hacker, and inventor of Experimental Devices for Performance. Check out his Website.
This Video has no real technology in it, but I found myself relating to it's message in some kind of strange way...
Check out this awesome tutorial from Kasperkamperman!
Arduino Flash communication from kasperkamperman on Vimeo.

Update: I've posted a new Easy Driver 4.2 Tutorial for those who are using the new design.

A quick tutorial on how to get things up and running with the EasyDriver v3.1 Stepper Motor Driver Board. A big thank you to Brian Schmalz, the designer of this board. It's obvious why he has called it the EasyDriver. It was indeed, an "EasyDriver" to set up ;)
PLEASE NOTE: some people have overlooked the extra (ground) pin on the easydriver board. It is not labeled on the board itself, but it is visible as the top right pin in the picture above. Grounding the easydriver board is essential but sometimes overlooked by newbies like myself :)
WARNING Easy Driver v4.2:
Please do not attempt this tutorial with new Easy Driver v4.2 board. Please consult the QA for version 4.2 on the Easy Driver Site for explanations on 4.2's extra functionality. For more information you can always look at the Data Sheet and Schematic as well.
Here is a copy of the code used in this Video:
A lip sync animation test for a character called Frankenegger from back in my film school days.
An update on the previous video. This time I have written a Python Plugin for maya. This makes it now possible for real time (viewport to servo) communication, without the need for dynamic playback. So now it is possible to literally keyframe your servo's position in time and playback it's animation!
A big thank you to John Park for blogging about these Ideas on the Make Blog. Check out what people have to say about it here
Edit: I have made some progress on this technique click here for more info
Just thought I'd post some pics of my first Spark Fun Electronics order which arrived in the mail the other day. I'm looking forward to testing out these little beauties over the next couple of weeks. The stepper driver board is a microstepper board. That means that it is capable of producing up to 1/8th of a standard step. Now that's precision! Probably too much precision for my application but hey, at $15 USD why not give it a try!

This is something that has been going around in the back of my head for a while now. It's amazing what you can find online these days. Practically all of the code for this setup is borrowed from other sources. So thanks to everyone who's contributed to this by posting their own projects on the web.
Here are the links to the main contributors:
http://www.arduino.cc/en/Reference/ASCIIchart
http://principialabs.com/arduino-serial-servo-control/
http://pyserial.wiki.sourceforge.net/pySerial
http://principialabs.com/wp-content/uploads/servo.py
http://www.digitaltutors.com/store/
I will post more details on this project as I get time. I'm am planning to document this whole Idea exhaustively.
This is just the beginning...
If you liked this post, check out PART 2 for some further progress
I'm always skeptical with these kind of "Magic Bullet" presentations. But this one is still pretty cool none the less.
For the full run down on this technology visit: gizmodo
Using Photographs to Enhance Videos of a Static Scene from pro on Vimeo.
This is my first successful attempt at driving a stepper motor from an Arduino Card. This has been a relatively cheap project which has taught me a great deal about different types of steppers and how to wire them up. My next project will be using a mini servo. After that, I will move on to a more advanced type of stepper control interface.
For the full blurb on this power packed device visit:
http://www.nycresistor.com/2008/08/08/announcing-sanguino-v10/
Sanguino: Arduino's Big Brother from Zach 'Iowa' Hoeken on Vimeo.
This is a film I worked on last year at RSP. We did CG vines for it. If you have a weak stomach, I suggest you sit this one out. Gory stuff. A Dreamworks production shot on mt tambourine in Queensland Australia. Here's a teaser. Navigate to, and click on the camera to see the trailier.

This is my first attempt at an Arduino Sketch. An Arduino Sketch is basically a prototype of some code that can be uploaded to an Arduino Card that in turn, can run various electrical devices (Light Emitting Diodes in this case). An Arduino Card is hobbyist's micro controller mounted on a circuit board. It's basically a simplified computer that can be hard coded through the use of a simple programming language.
This is totally inspirational to me. I've been thinking about the possibilities of motion control for a while now. Can't wait to start my first stepper motor project in my next lot of holidays! So Cool.
Check out this guy's site! The Art Of Motion Control


Ok, so this is just a render I did Sunday evening when I had a bit of free time. The checkered parts don't have textures yet. Some parts have bump maps. I estimate he's about 70% done. Gonna start spending a bit more time over the next few weekends to get him ready for rendering. Spent most of my time getting the light to look right for this render. I'm pretty happy with it now and I think the effect will animate well from the few tests I did. Still I think the glow is a bit too intense. Might look at this next weekend.
more soon...
Part of my studies at the A.F.T.R.S was Titles Design. This site would have been so useful back then. For now it will just have to be eye candy. Loads of great ideas here!
http://www.artofthetitle.com/
Right.. That's it!!! Now I'm just too inspired! Now I know what to spend my tax refund on :)
Maker Faire 2008: Robots - video powered by Metacafe
In the spirit of Mothers Day I thought it was time for a nice healthy dose of Lucas for us all :) He is just over 8 weeks now. Generally he is well tempered and very easy to care for. He is starting to follow things with his eyes and gives us a smile every now and then (if we're lucky :) Naturally we feel totally blessed to have him in our lives!


This is a "Behind The Scenes" Doco of a short film I am still working on. How ironic. It turns out the the shoot was so interesting that we were able to make a small doco out of it. I am still working on all of the 70 visual effects shots that are needed to complete the film.
Talk about biting off more than one can chew. Oh well, we've all come a long way since then. I will post a cut of the film when it is closer to final cut. Enjoy.
Lets Make Robots is a site I've been visiting a lot lately. As a kid I tried to make a robot of my own but never got around to finishing it (surprise surprise :) . This site is a great intro to basic robotics and programming micro processors.
I hope to buy a starter kit one day and make one of my own. This interests me because it's a great chance for me to take what I've learned about rigging and programming in 3D into the real world!
Here's a clip of one of my favorite Robots on this site.
Egg Cup Boy was a the result of a collaboration between Craig Bunker, Andrew McLean and myself, Daniel Thompson. The year was 1999 and this short was part of our studies at M.A.P.S. (Media Arts Productions Skills) at Hamilton College in South Australia.
We had no Idea what we were doing or how we would do it. All we had was a few Cardboard boxes and some Modelling Clay and Free Reign of Andrew's Parent's basement.
The film took around 3 months to shoot, and many late nights of cutting together royalty free sound samples for the score and sound design.