Wednesday, December 7, 2011

Arduino Push Button ON/OFF Example


Someone posted a request for this in the comments. After a quick search I couldn't find a simple example on how to do this so here's one I made based on the Debounce example sketch in the Arduino IDE.

arduino codeDebouncePushButtonOnOff

/* 
 Debounce
 
 Each time the input pin goes from LOW to HIGH (e.g. because of a push-button
 press), the output pin is toggled from LOW to HIGH or HIGH to LOW.  There's
 a minimum delay between toggles to debounce the circuit (i.e. to ignore
 noise).  
 
 The circuit:
 * LED attached from pin 13 to ground
 * pushbutton attached from pin 2 to +5V
 * 10K resistor attached from pin 2 to ground
 
 * Note: On most Arduino boards, there is already an LED on the board
 connected to pin 13, so you don't need any extra components for this example.
 
 
 created 21 November 2006
 by David A. Mellis
 modified 3 Jul 2009
 by Limor Fried
 
This example code is in the public domain.
 
 http://www.arduino.cc/en/Tutorial/Debounce
 */

// constants won't change. They're used here to 
// set pin numbers:
const int buttonPin = 2;     // the number of the pushbutton pin
const int ledPin =  13;      // the number of the LED pin

// Variables will change:
int ledState = HIGH;         // the current state of the output pin
int buttonState;             // the current reading from the input pin
int lastButtonState = LOW;   // the previous reading from the input pin

// the following variables are long's because the time, measured in miliseconds,
// will quickly become a bigger number than can be stored in an int.
long lastDebounceTime = 0;  // the last time the output pin was toggled
long debounceDelay = 50;    // the debounce time; increase if the output flickers

void setup() {
  pinMode(buttonPin, INPUT);
  pinMode(ledPin, OUTPUT);
    Serial.begin(9600);
}

void loop() {
  // read the state of the switch into a local variable:
  int reading = digitalRead(buttonPin);


  // check to see if you just pressed the button 
  // (i.e. the input went from LOW to HIGH),  and you've waited 
  // long enough since the last press to ignore any noise:  

  // If the switch changed, due to noise or pressing:
  if (reading != lastButtonState) {
    // reset the debouncing timer
    lastDebounceTime = millis();
    
   // this is all that's new to the code 
   // toggles the ledState variable each time the button is pressed 
      if (buttonState == HIGH) {
      ledState = !ledState;
      Serial.println(ledState);
    } 
  } 
  
  if ((millis() - lastDebounceTime) > debounceDelay) {
    // whatever the reading is at, it's been there for longer
    // than the debounce delay, so take it as the actual current state:
    buttonState = reading;
  }


  // set the LED using the state of the button:
  digitalWrite(ledPin, ledState);

  // save the reading.  Next time through the loop,
  // it'll be the lastButtonState:
  lastButtonState = reading;
}

Thursday, August 18, 2011

My First Animation Editor (With Bezier Curves)

I've been working on this on and off for a while now. Ever since I got Maya talking with the Arduino. I thought to myself, "wouldn't it be nice if there was a free app that wasn't bloated and designed just for animating parameters?" Well, I just hit my first milestone for this goal. Eventually I would like to add multi-segment Bezier Curves. Then I would like to have multiple channels of animation. It's all written in Processing so serial communication with the Arduino should be simple. The trickiest thing to get working was the lookup of the Y value on the curve based on where the Time Slider is. Many thanks to Ben Paschke for finding the function I needed in the Blender Source Code and helping me port it to Processing.

There is another Processing Tool out there called Timeline but it's heading in a different direction than I am and I wasn't a fan of it's mixed languages and non-realtime Y lookup function. Plus, I thought this would be a good challenge to set for myself considering the industry I am working in :)

Hotkeys:
Spacebar = Play/Pause
J = Play Forward
K = Play Backward
L = Pause
Left Arrow = Step Backward 1 Frame
Right Arrow = Step Forward 1 Frame 

Click and Drag to Position the Handles or Timeslider

Friday, July 15, 2011

Genuflex Virtual Axis Formula

A Sketch to Demo the core Function of the Virtual Axis on Genuflex Motion Control Rigs


 http://www.general-lift.com/GLMoCo/Products/Genuflex_Mk3/Prod_mk3_p1.html

Notice how the length of the Hypotenuse(c) stays fixed on the triangle no matter where you move the rig.

Please Note that this only demos the Z,Y axis an not the X,Z axis. But the principle is the same for X,Z and gives full 3D positional control of the rig as long as the boom (Hypotenuse) is long enough to accommodate the max distance of where you want to place the camera(mouse in this case).

Wednesday, July 13, 2011

Tonight's Hack Session!

You can read about it here

Friday, July 1, 2011

Arduino Timelapse Shield


Greetings Arduino and Timelapse Enthusiasts! Just thought I'd give you a sneak peak at what I've been working on of late. It's a Remote Shutter Proto Shield. I'm aiming to make this shield compatible with all major brands SLRs. Of course this is a very hard claim to make if I don't have access to all camera's for testing. I'm confident that it will work with Panasonic,Canon and Pentax SLRs at the very least. But as you can imagine I really need to do my homework on what's out there before I sell a product that claim this type of compatibility 

The shield will be compatible with the open moco timelapse engine as well as being a completely customizable with it's prototyping area. It's not a complicated circuit really. The most complex components are the opto-couplers which are basically just optical switches that safely trigger the focus and shutter on your camera. So I'm getting close to the manufacturing stages, I just have a few measurements to triple check before I send of the gerber files. This is quite a leap in complexity from the last PCB I designed. But I'm hopeful that it will work just as I designed it to when product is finally manufactured.

Friday, June 3, 2011

Disassemble Reassemble

In light of recent PCB manufacturing explorations, I have decided to go into business! Well on a very small scale :) Check out my new online store. Below are some pictures of what's currently in stock.

Monday, May 30, 2011

My First PCB Design (Part 2)


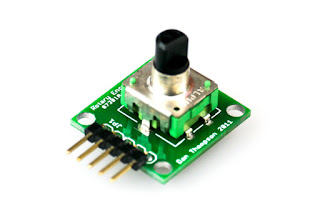
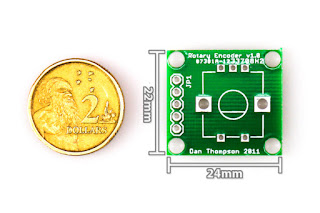
Well if you read my last post, you will know that I have been waiting for my first ever PCB design to arrive in the post. Well it finally came! exactly 10 working days from the time of order. Overall, I'd say the result looks pretty good! I haven't soldered one up yet. But when I do, I will do a video. The encoder fits perfectly, the only thing I might have done differently is give more space around the mount holes for extra strength. Please leave a comment if you would like to purchase one of these. They are designed to fit this rotary encoder from Spark Fun Electronics. If there is enough interest I will look into a simple way to sell and distribute online. Next stop, Arduino Shields!

If you want to make your own, check out the prototyping service at this link.

AVAILABLE FOR PURCHASE NOW! visit my ImMojo Store

Wednesday, May 11, 2011

My First PCB Design (Part 1)

I've been playing around with a rotary encoder I bought from sparkfun.The pins wouldn't fit in a breadboard and I got sick of spaghetti wires everywhere.

So I asked my local hacker space about PCB etching. I decided to give Iron On Transparency Sheets a go. But I got half way through buying the bit's I needed and then came across this site. I'd already done some Eagle Cad Tutorials to create my circuit for the Iron On sheets. So I looked at how cheap I could do a PCB run with the design I already had. It turns out Very Cheap! About $14 AUS for 10 pcs including shipping. I literally can't make them myself for that much so I thought why not give it ago!?

This is my first design.


The boards should arrive in a couple of days. I'll do another post when they arrive.

Here's a link to Part 2 of this post.

AVAILABLE FOR PURCHASE NOW! visit my ImMojo Store

Tuesday, May 10, 2011

makerslide open source linear bearing system


I'm gonna pledge some money to this. Just the thing I'm looking for at the right price.

Friday, March 25, 2011

Houdini Controlling Servos!

Who needs Maya when you have Houdini!

I've been wanting to do this for ages but not knowing houdini's api has blocked me. Thanks Alvin for this awesome video! If it works with houdini apprentice, I will be very excited!

Saturday, February 19, 2011

Timelapse Calculator for iPhone


Well actually it's called Timelapse Helper. Thanks Simon Loffer for his slick, and much more portable take on the Original Timelapse Calculator. Follow this link to download the iPhone app. I hear Simon is keen to do an Android version soon too. Man, I love open source!

Saturday, January 22, 2011

Adelaide Hackers Soldering up a Storm!

Hackerspace Adelaide volunteers gave up their time today to solder up POV kits for the kids who visited the science pavilion at the Adelaide Tour Down Under. Those who brought their bikes were lucky enough to take one of these kits home!